


Zoom for education has come from relative obscurity to being at the forefront of many schools, and educational establishments’ online teaching strategies in the last year. As online teaching and instruction have grown beyond all comprehension, the rise of online communication platforms has played an essential role. Without a good platform, there simply is no teaching. Zoom is an all-around communication platform allowing business meetings, large-scale conferences, and social hang out but it has a specific Zoom for education package designed for the educators to deliver online lessons live and share materials. One of the biggest hurdles to overcome with this model of teaching is the reluctance of students to use unfamiliar applications, but the general increase in consciousness of Zoom, it is regularly used for new reports, video concerts, etc help smooth this potential issue. You may also be interested in How to Use Technology in Education: Save Time and Improve Engagement.
So let’s look at why Zoom has become one of the biggest players in the market and what it can do for your teaching.
In this article:
1. How to use Zoom.us for online education?
1.1. How to install
1.2. How to get your class in the Zoom.us meeting
1.3. Requirements
1.4. Pricing
2. 10 Useful tips to integrate zoom into your education process
1. How to use Zoom.us for online education?
As well as a general use communication and collaboration platform Zoom has a specific education plan aimed at schools, universities, and private tutors and is widely used by schools and also universities such as Berkeley and the University of Sydney as well as the British Council. All you need to do is set up an account through your school’s email account. and wait for verification.
1.1. How to install

Installation is via download from www.zoom.us once you’ve activated your account through the emailed link. Simply follow the on-screen steps.
1.2. How to get your class in the Zoom.us meeting
Once you are up and running you’ll need to schedule a meeting (class) by pressing the schedule a meeting button on the zoom site. Enter the required details of the lesson Topic, Date, and other related details and press Schedule. You can also set up the Registration required when scheduling a meeting, as that allows you to generate a registration report at the end of the meeting. Once you’ve scheduled a class, your class members can join when you “start” the class. There are 3 ways for participants to join the class, and all are straightforward. Option 1 is to join via meeting URL by clicking on a shared link from an email. newsletter or calendar invite. Clicking on this link will take the student directly to the meeting. Or the student can join through the desktop using the Meeting ID. Or finally Option 3is through the Web client/browser.
1.3. Requirements
The primary requirement is an internet connection, the stronger and more stable the better. Zoom, however, does not require ultra-fast internet speeds. You will also need speakers and a microphone in order to communicate, plus a webcam.
As for your computer system Zoom is supported by Windows, Linux, and Mac plus other operating systems. It works on Android and Ios devices and for tablets with Windows 10. Zoom for education also works on most popular browsers.
Full system requirements can be found at Zoom.Us Requirements.
1.4. Pricing
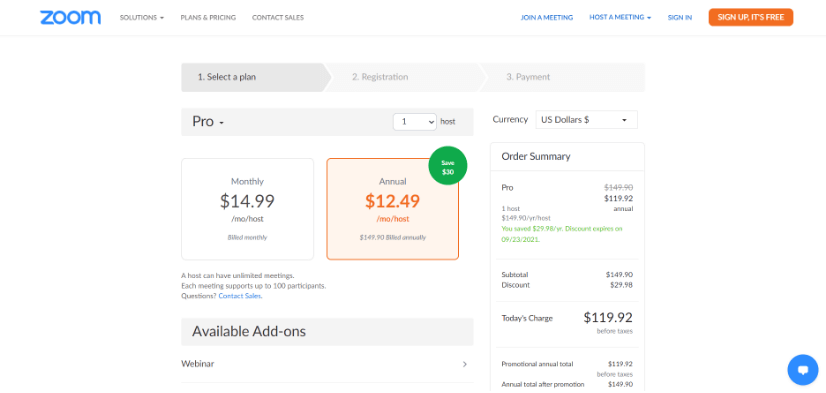
The basic (personal meeting) version is free, and the previous 40-minute limit on group meetings has temporarily been removed. This basic plan is for an unlimited number of meeting with up to 100 participants.
The Pro version costs $13.99 per month per host with up to 9 hosts included. This includes all the standard features but with additional admin, management, and reporting features plus cloud recording.
There are two higher plans for business and enterprise that are available.
2. Useful tips to integrate zoom into your education process
Zoom for education is designed to aid virtual classroom education and as such has features that you can easily integrate into your teaching to add value to your lessons.
Tip 1: Introduce your students to Zoom for education
For your first class, set aside some time to introduce your students to Zoom for education and ensure that they’re able to connect their audio and video. zoom is easy to use but the sooner everyone is comfortable with the platform the better it will be.
Tip 2: Share Your Screen

One of the main functions is the harder screen option. By simply clicking on the button at the bottom of the control panel you can share your screen with your students. This means you can prepare your lesson as a presentation, access online resources, and look at pre-prepared worksheets and other documents. Additionally, Zoom allows you to annotate these documents live, by circling, underlining, pointing, and writing and you can allow designated students to annotate too. Usefully, when your screen is shared your pupils are still shown on a moveable window within the screen.
Remember when you share your screen, the learners can see whatever is on your screen, so remove personal screen savers, desktop icons, and anything personal that you do not wish to be seen.
Tip 3: Promote engagement
Zoom for education has icon buttons to promote reactions from your classes, these include hands up, thumbs up, clapping, speed up, and slow down reactions. These encourage engagement in the learners. without interrupting the lesson flow. there is also an interactive whiteboard feature so you can imagine you are back in the physical classroom, the board can be saved within zoom if you wish to reuse it.
You can also create single choice or multiple choice (up to 10 choices) polling questions within the Zoom app. Another way of using Zoom for education to promote engagement is to designate a student to share their work by allowing them to share their screen, this way they can show off their own presentation or work for the group to see.
Tip 4: Use the Chat Function

Zoom for education has an in-built chat function, allowing the teacher to chat with individuals or the whole group during the lesson. It also allows learners to ask direct questions to the teacher that they may not want to ask publically, asking for help or extra work for example. This chat function can also be used for students to chat with each other, the settings options enable this function to be turned off or on depending on the host’s choice.
The chat function can also be used to send files, with a simple drag and drop method. The student then clicks on and saves the file to work on or look at later. It should be noted that it is worth having email addresses for students on devices that cannot access these shared files on chat.
Tip 5: Session Record
The paid-for version of Zoom for education features a record button at the bottom of the control panel. Clicking on this button gives you the option of recording to your own computer or to the cloud. This function is ideal if you want to review your lessons or send them to students who have missed the lesson for whatever reasons. It is also good for evidence-based learner activities that the teacher wants for their own portfolio or advertising. you do not need to record all of the lessons, simply turn the recording off and on whenever you choose. If you record to the cloud, you will receive an email after the lesson has finished, notifying you that the lesson link is available. You can then share this link with whomever you choose.
Tip 6: Try Zoom Virtual Backgrounds

Zoom for education includes the possibility of adding a virtual background. Virtual backgrounds can interest the lesson, introduce talking points and ice-breakers, and vitally can disguise your usual background. If you are teaching from home you may not wish to give your student an insight into your home circumstances.
Tip 7: Let Students Work Together
Zoom for education allows for students to be split into smaller groups for joint work projects. The breakout room feature, gives the host complete control over separate rooms, including sizes and number of rooms. The host can manually assign learners to a room or automatically assign them, and the host can join in and out of whichever room they decide for however long they want. This gives you plenty of control. A further useful feature here is the ability to broadcast a written message to the rooms, perhaps informing them of how much time they have left. When you are ready, the host can close down the rooms and rejoin everybody together in the main lesson.
Tip 8: Prepare videos
Using videos for online education is a great idea. You can find useful videos that explain your subject on the web or make your own videos – this way you will save time explaining the same thing over and over again. As you can share the screen, you can run video on your own screen, which the pupils have direct access to.
Tip 9: Connect with Google Calendar

The Zoom Chrome Extension allows participants to schedule Zoom cloud meetings directly from Google Calendar. With the click of a button, you can start an instant meeting or schedule a future meeting. This is really useful when lessons are flexible or changing times and even more so if you are teaching classes in different time zones.
Tip 10: Control discipline
Without the hands-on discipline of the physical classroom, many teachers don’t feel they have the same control. Zoom for education helps out here. The host can use settings to establish what learners are allowed or are not allowed to do. For example, settings can turn off pupils’ ability to chat with each other or rename themselves, which will automatically solve a lot of potential problems. Hosts can also mute pupils and if need be”remove to waiting room” which places the student outside the classroom until you choose to readmit them. It is well worth going through the setting before you start teaching and preempting any issues so you are not always playing catch-up.
Final Words
Zoom for education has become ubiquitous, and with good reason. Early issues with security seem to have been resolved and the platform itself is reliable, with high video and audio quality. The additional educational resources such as interactive whiteboards, screen sharing, share files, etc add educational value and flexibility of performance. There is no need for your lessons to become one-dimensional lectures. there is plenty of scope for collaboration and creativity. Our advice would give it a try, and spend some time getting to know it, it’s easy to pick up quickly but the more efficient you feel on the platform the more confident you will appear in the lessons. There’s plenty of material online to help you with any issues, should you experience problems.
You may also be interested in some of these related articles: