


In this tutorial, we will teach you how to create a print-ready business card template with bleeds in Adobe Illustrator CC. We are also going to tackle the concept of bleeds, trims, and safe areas and how to set up them in older versions of Illustrator, too.
1. Document Setup
Follow the next steps to create a new document.
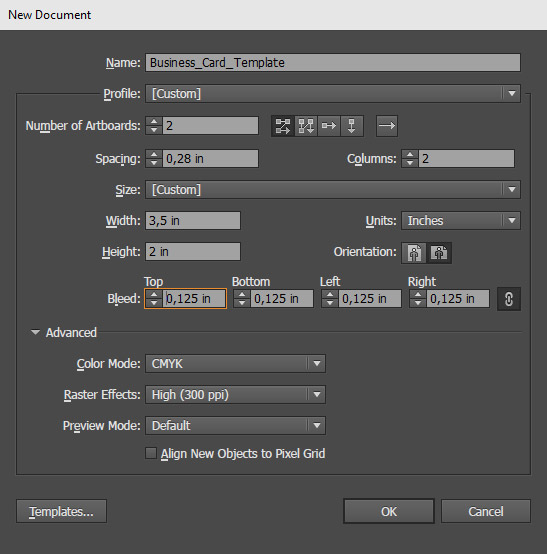
- Enter a name for your document in the Name text field.
- Select Custom (if not set by default) from the Profile drop-down menu.
- Number of Artboards. Set this number to 2 for two-sided, and to 1 for one-sided business card templates.
- Spacing and Columns are up to your preferences. They define the positioning of your artboards on the canvas.
- Select Custom from the Size drop-down menu.
- Define the Width, Height, Units, and Orientation of the document. In this case, we will make a horizontal 3.5 by 2 inch (1) business card, while using inches (2) for measurements throughout the working process.
- Newer versions of Illustrator would save you some time by giving you the option to specify the Bleed zone in the New Document dialog. Set all sides to 0,125 inches for now. Later, we will be talking about bleeds and how to set them manually in older versions.
- Expand the Advanced tab (if not already expanded) and set the Color Mode to CMYK and Raster Effects to High (300 PPI). These are the standard settings for print materials.
(1) 3.5′ x 2′ is a standard size in the US. Keep in mind that a business card’s size and bleeds may vary in different countries. International Business Card Dimensions Guide
(2) Using inches as a measurement unit is not mandatory. You can also work with millimeters or centimeters if you are not familiar with inches.
2. Bleed, Trim and Safe Area
Once the document is created, we need to make sure that our final design will remain intact after the business card has been printed and trimmed.
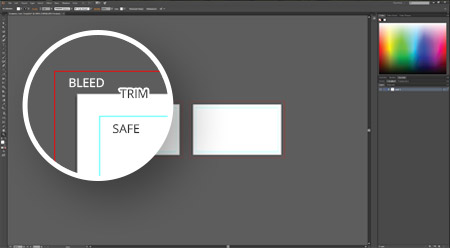 Bleed. This is the portion of your design that will be trimmed off when after cutting the card to its final size. In this case, the final size of the business card template will be equal to the size of the white artboard. The bleed’s purpose is to make sure your design or image entirely covers your card, leaving no unsightly white edges after trimming.
Trim. This is the final size of your card after the ‘bleed’ has been cut off.
Safe Area. This is an area inside the trim. Being smaller than your final card, the safe area is kept far away from blades and cutting machines. This is where you should place the most important information or sections of your design. Anything outside of this area runs the risk of being cut off!
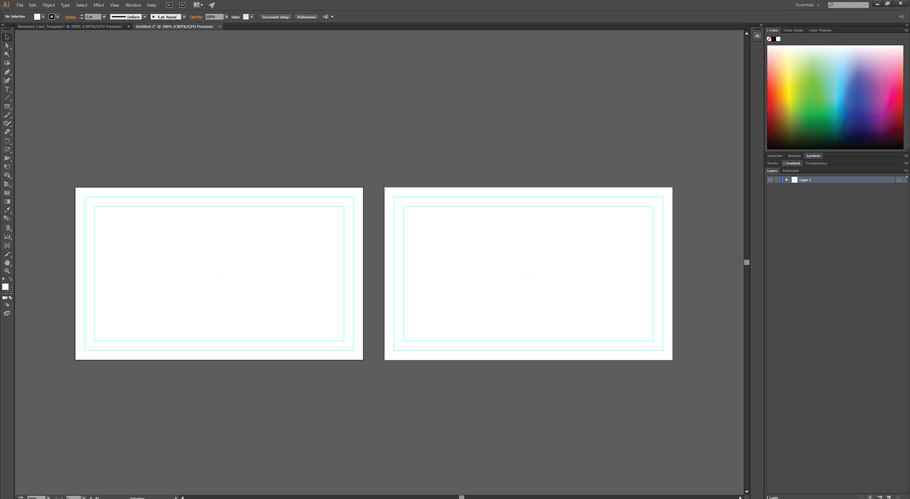
2.1 Define the Safe Area
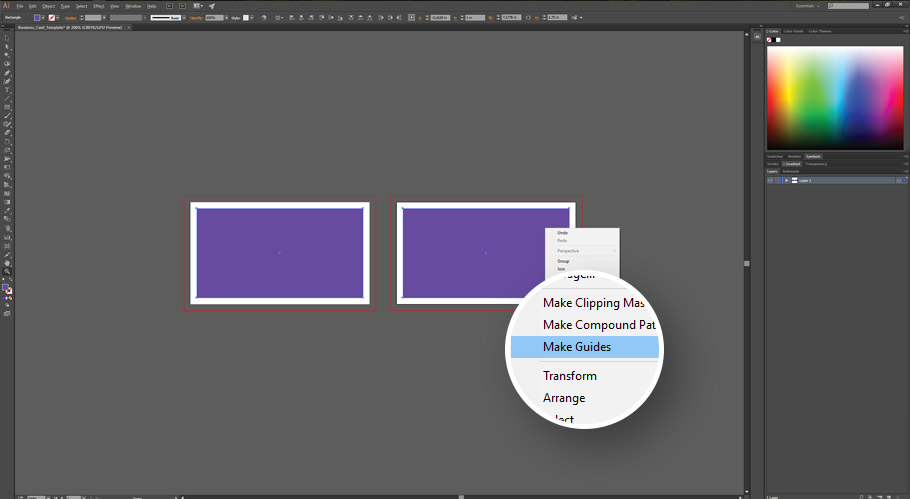
We specified that we want to have a 0,125′ bleed on all sides in the New Document dialog box. Illustrator handled that for us quite well. But we need to define the safe area ourselves. For this purpose, we will create two 3,25′ by 1,75′ rectangles and place them right in the centers of both artboards. Then we will convert them to guides and this will create a 0,125′ indent from the Trim on each side.
- Select the Rectangle Tool (M) and click on one of the artboards.
- Set the width to 3,25 and the height to 1,75 inches.
- Select the rectangle and align it with the center of the artboard by using the Horizontal Align Center and Vertical Align Center from the top sidebar.
- Drag the rectangle to the other artboard by holding down the Alt / Option key to make a copy of it. Then, repeat step 3.
- To convert the rectangles to guides simply select them both and right-click on one of them. Then select Make Guide from the context menu.
2.2 Manually Defining the Bleed
If you are using an older version of Adobe Illustrator, there is a possibility that it won’t have the Bleed option in the New Document dialog window but don’t worry! It’s not that much of a deal to make it manually. The difference between this method and the first one is that you should create your document with the size including the bleed zone and then, create two rectangles to define the final size of the business card template and its safe area.
- Create a new 3,75′ by 2,25′ document with the same settings from the first method and then click OK.
- Take the Rectangle Tool (M) and create a 3,5′ by 2′ rectangle. Align it with the center of the artboard. Convert it to a guide and you’ll have your final size (the trim).
- Create another rectangle. Make it 3,25′ by 1,75′ this time and align it with the center of the artboard. Convert it to a guide and your safe area will be set.
- Repeat these 3 steps for the second artboard.
It’s pretty simple. Here’s how your document should look like once you finish these steps:
3. Exporting a Print-Ready PDF Document
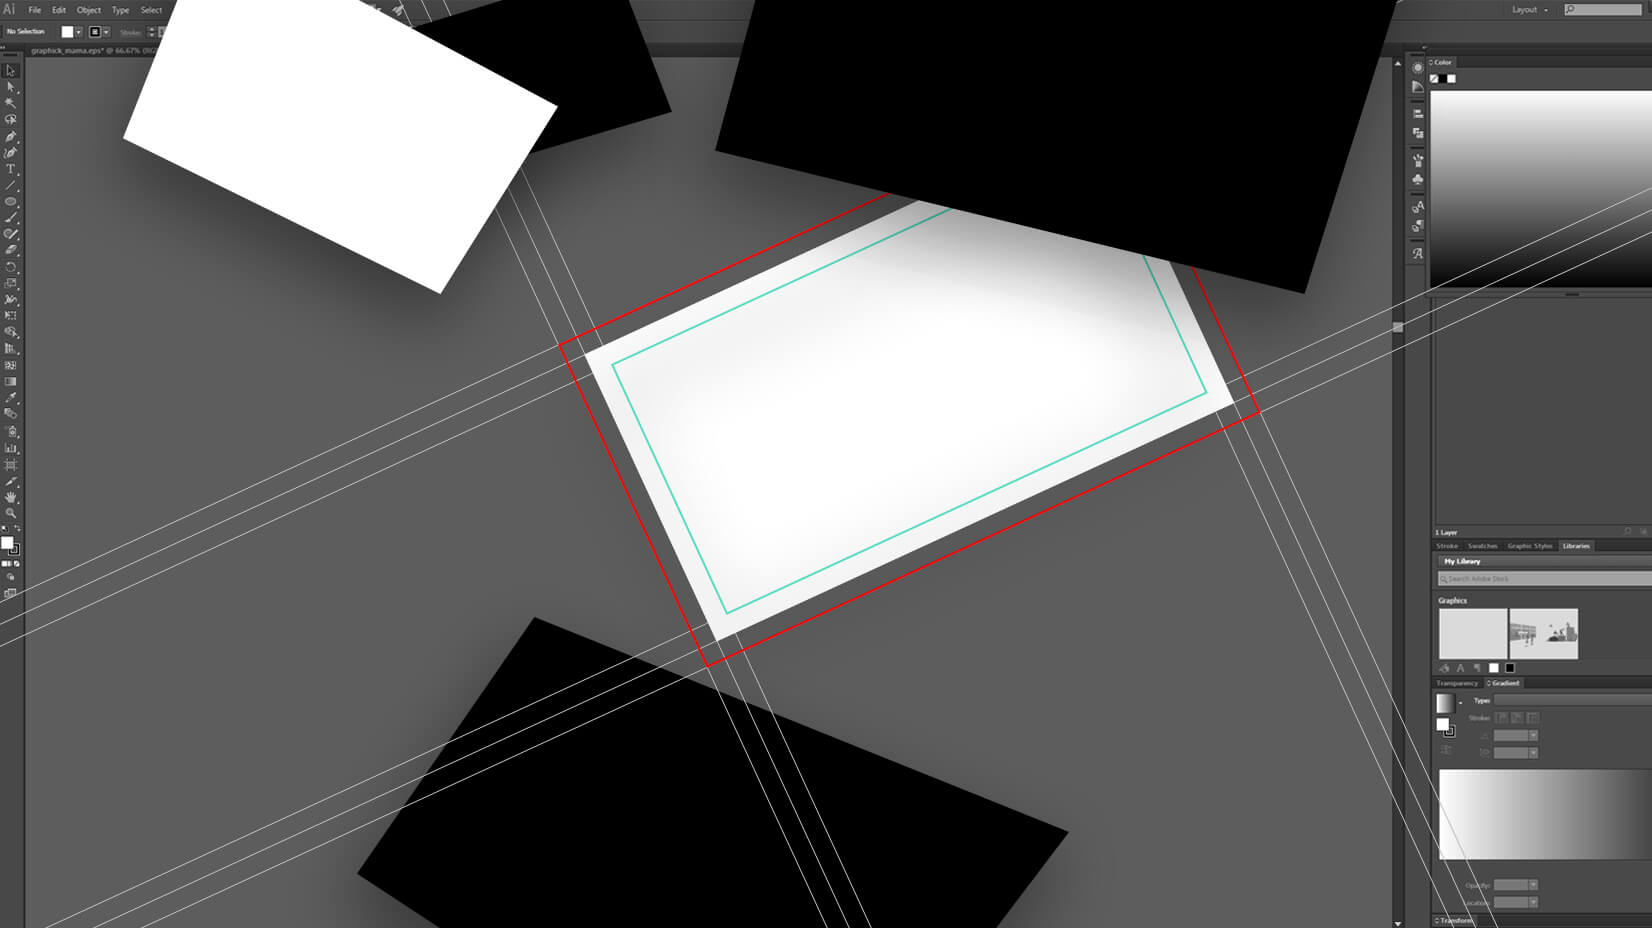
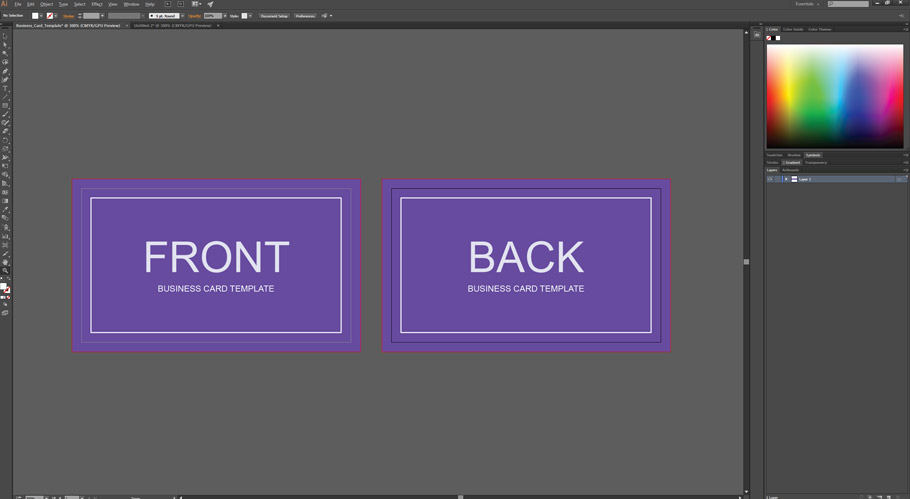
Let’s assume that this is our final design in the example below. We have a solid color background that we want to expand to the very edges of the business card template without leaving any unsightly white edges after trimming. That’s why we should extend it all the way to the end of the bleed. We’ve outlined the safe area to use as a design element. This way, we’ll end up with a nice, clean frame near the edges of the business card.
Follow these steps to save the document as a print-ready PDF.
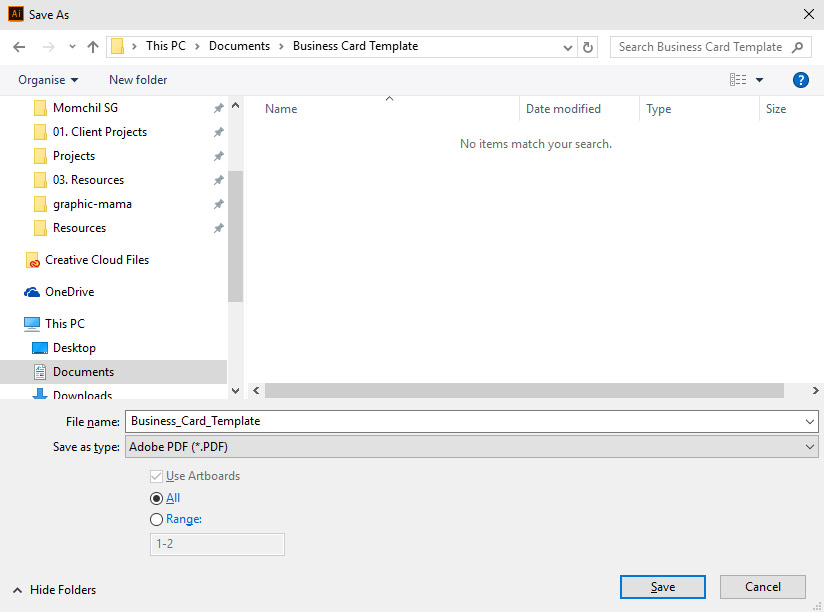
- Go to File -> Save As.
- Choose Adobe PDF (*.PDF) from the Save as type drop-down menu.
- Make sure All is selected if you have more than one artboard and then click on Save.
A new dialog box will open.
In the General tab, set the Adobe PDF Preset to [Press Quality] and uncheck Optimize for Fast Web View.
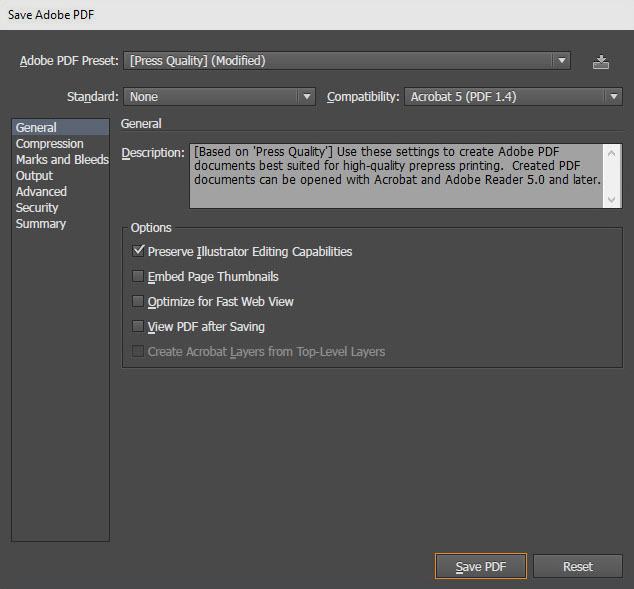
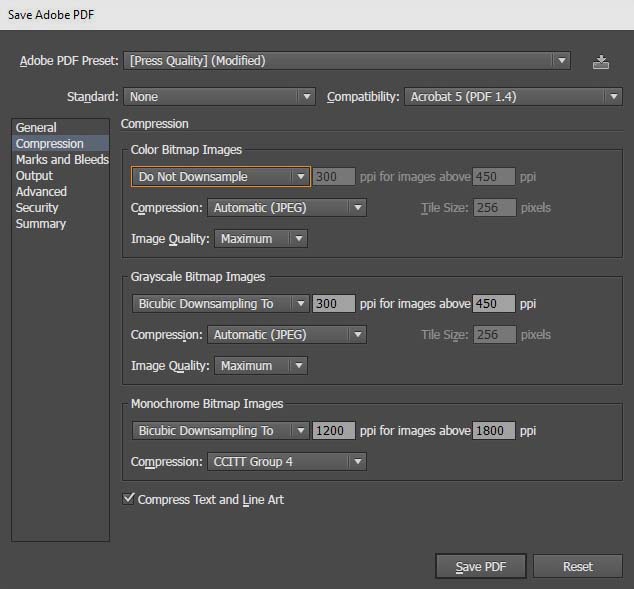
Now, go to the Compression tab and set the Color Bitmap Images to Do Not Downsample in case you have images in your design.
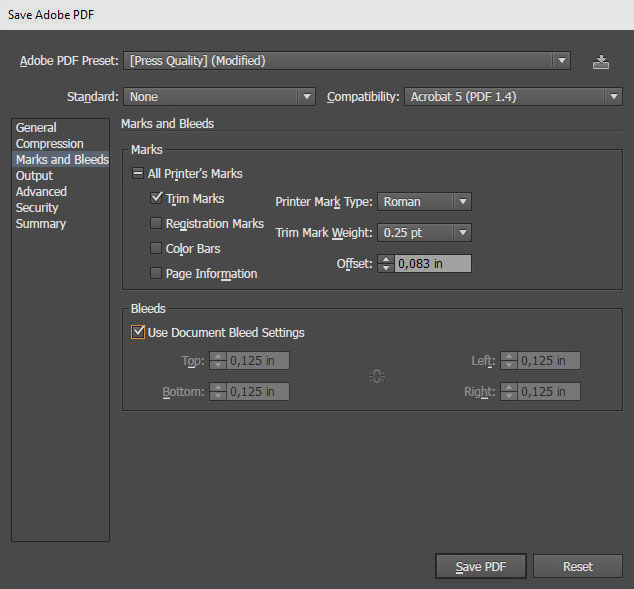
Move on to the Marks and Bleeds tab and check Trim Marks and Use Document Bleed Settings and then click on Save PDF.
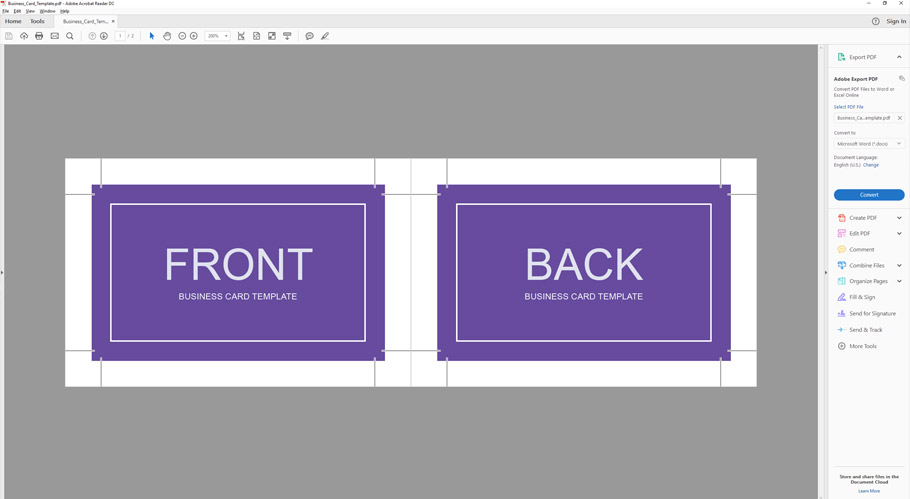
Here comes our final result. The trim marks indicate where the paper will get trimmed. The thin white frame we’ve made is actually our safe area. Keeping everything important inside of it ensures that the blades won’t get anywhere near our important information.
Notice that the background expands a little bit beyond the trim marks. This is the bleed zone. Now, when those cutting machines do their job, there wouldn’t be any chance of white edges ending up in our printed business cards.
If you don’t feel like going through all these steps, you can use the template we’ve just made.
A vertical business card template is also included.
You may also be interested in this related article: The Top Online Business Card Makers in 2022