


Recording your presentation can be a very powerful move, as you don’t want to embarrass yourself in front of your audience. Instead of relying on your “inner feelings”, you can check how you sound, how you look, what gestures you make, and how well you play with words and details.
For this guide, we will use some of the most popular online tools on the market (Panopto and Loom) and some totally free options for Windows and Mac computers.
Article overview:
1. Why do people record their presentations?
2. How to record a presentation on Google Slides using Panopto?
3. How to record a presentation on Google Slides using Loom?
4. How to record a presentation on Google Slides using Microsoft Windows?
5. How to record a presentation on Google Slides on a Mac?
6. Other tools you can try
1. Why do people record their presentations?
There is a reason why people record their presentations. Unfortunately, you don’t know how your voice will sound or articulate when you are presenting. In such situations, it will be best to record your presentation to see if there is something you need to change before doing it live. Also, recording your presentations is a very good way to remember what you are about to say. But let’s see the main use cases when recording your Google Slides presentation will make great sense:
- Practice your presentation skills – you can’t hear yourself while talking. That is why recording your voice might be a good indicator of how you present. Is your tone of voice smooth? Do you need to raise it? Are you mumbling or “like”-ing? Recordings can help you identify problems in advance.
- Save valuable time – instead of recording each lecture, you can save your efforts once, and later sent them.
- When you have stage fright – not everyone has the natural confidence of Elon Musk. If you are a shy person who gets terrified when speaking in front of huge audiences, recording your presentation is a great move.
- Avoid distractions – during live presentations, interruptions are more common which can affect your flow. A recording of your presentation at home can later be sent as a follow-up.
2. How to record a presentation on Google Slides using Panopto?
There are plenty of tools that could be utilized, so feel free to use anything which you might find suitable. Panopto is a good option since it doesn’t require us to download a software extension, and it has a free plan which is more than enough for starters. Your videos are also stored on Panopto’s drive, so you will avoid issues with cluttering your computer or mobile device.
Pros
✔️ Panopto is very easy to use.
✔️ The software is cloud-hosted.
✔️ Speech and OCR (optical character recognition).
Cons
❌ Pricing model is scaling.
❌ Slow rendering process.
❌ Issues with captions.
Step 1. Open Panopto.com
When you open the website, you will see there are plenty of options out there.
Step 2. Click on “Record”
Once you’ve opened the website, click on the big red button “Record” (next to Company and before Get Started).

Step 3. Select your Audio, Video, and Screen Options
The browser will ask for permission, so make sure you grant Panopto access to your webcam(s) and audio source(s). Usually, if you don’t have more than one source, they will be launched by default.

Step 4. Choose what to share
Now, you have to click on Screens and Apps, and select your preferred option.
Entire screen (if you have 2 or more, you can either select one of the screens or all of them), a Window, or a Chrome Tab.

Step 5. Fix the settings
When you click on the “Settings” button (in the bottom right corner), there will be a menu that you can access.

Step 6. Start recording
Click on the big circle in the center to start recording.

Step 7. Save your recording
Once you end your recording, you can send it to Panopto, YouTube, Classroom, or download it on your computer.

3. How to record a presentation using Loom?
Loom is among the most used recording pieces of software globally. It is great for teamwork and has a lot of collaboration tools. Let’s see where it shines.
Pros
✔️ It is very easy to use.
✔️ You can share the videos with a single click.
✔️ Developers are constantly updating the app.
Cons
❌ The 5-minute free plan is not enough for long projects.
❌ It renders the videos slowly.
❌Lack of options to insert tags and notes in a video.
Step 1. Open Loom.com
The first step is to launch Loom. Just like Panopto, it’s an online-based service, so you don’t have to download or install anything.
Step 2. Sign up
Now, you have to open an account. The good news is you can use your Google Account to log in.
Step 3. Enter the recording settings
In order to start recording, click on New Video, and then from the dropdown menu select Record a video.

Step 4. Start the recording
Once you have selected whether or not you will use your Screen, Camera (or both), you can add some specific options and start recording. You’re limited to five minutes on the free plan, so don’t waste much time.

Step 5. Pause/Finish the recording
On the bottom left corner, you will have the option to pause or finish (the red square button) the recording. Before saving, you will have the options to Trim the Video, change the title (Loom | Free Screen & Video Recording Software – Day/Month/Year is by default), and make some Video Preferences.
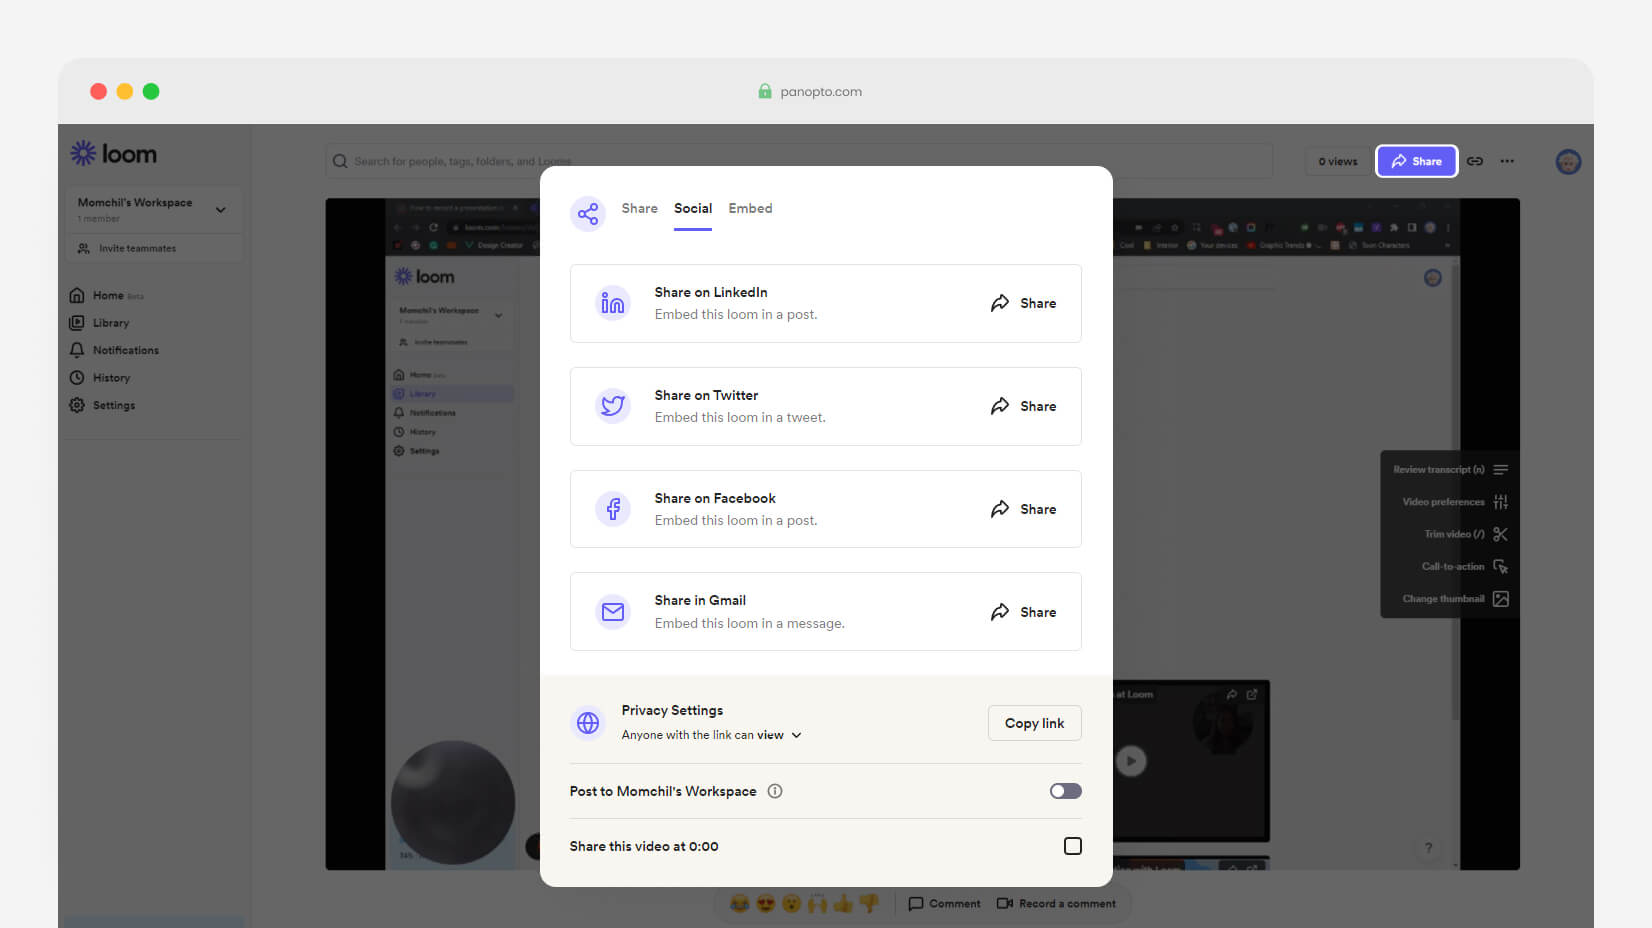
Step 6. Share the video
Once you’re ready, you can share the video on different platforms like Twitter, Facebook, LinkedIn, Gmail, etc.
Video Tutorial
4. How to record a presentation using Microsoft Windows?
There is also a free way to record presentations on your Windows computer. If you use Windows 10 or 11, this might be a good option.
Pros
✔️ You don’t have a record limit (as long as you have memory).
✔️ It is totally free forever.
Cons
❌ It is a very basic recording option.
Step 1. Open Game Bar
Many of you may seem surprised, but Windows has a built-in recording tool. It’s called Game Bar. To access it, you need to press the WIN + G. Of course, make sure it is enabled first.
Step 2. Click on “Capture”
The Capture button is next to the sound button. It will unlock you with the option to record.

Step 3. Click on “Record”
Click on the Record button which is the third from left to right. You can also start recording with Win + Alt + R.

Step 4. Record your clip
Now, you can freely record your clip.
Step 5. Delete or save the clip
Once you have filmed your presentation, you can either go to the folder where your file is stored, or delete it.
5. How to record a video on a Mac?
Last but not least, we have another free option for Apple users.
Pros
✔️ QuickTime is free forever.
✔️ There are plenty of recording options.
✔️ You can record an unlimited time.
Cons
❌ You are storing the files on your Mac.
❌ Not available on desktop PCs for free.
Step 1. Open QuickTime
The first thing you need to do is open your QuickTime.
Step 2. Click on File -> New Screen Recording
Once you’ve opened QuickTime, you have to select File -> New Screen Recording.
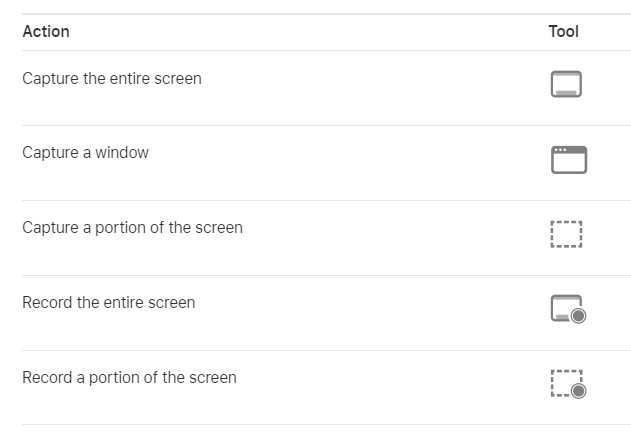
Step 3. Select what portion you would like to be recorded
There are several options that you can choose from.
Step 4. Start recording
After you have selected what portion of your screen you will record, you are free to start recording your screen. You have plenty of options for convenience, such as a timer, built-in microphone, where to save the recording, etc.
Video tutorial
6. Other recording tools
Of course, these 4 are just the tip of the iceberg. There are many more apps that also deserve attention but couldn’t rank higher on our list. Let’s see which they are:
- Zoom – Zoom is one of the most popular presentation software on the market, and the only reason it doesn’t appear here is because of its significance. We have prepared a separate tutorial on how to record a presentation in Zoom.
- AnyMeeting – it’s a very powerful presentation recording software. However, over the past few years, it lost some of its sheer power and it got passed by different platforms that offer much more versatility at more affordable prices.
- Camtasia – what we love about Camtasia is that you can create a next-level video experience. The cross-platform functionality is a great addition. However, it seems too hard for small tasks and the $300 purchase is not the value we are looking for here.
- OBS Studio – it’s a top solution for cross-platform live streaming. It has high-end functionalities and it is open-source. That’s great but there’s a catch – it’s too complicated for the average user.
- Debut – Debut is a great free tool that allows webcam recording and presentation recordings, too. However, it’s not compatible with any other OS than Windows, and the user interface looks dull.
- Screencast-O-Matic – it’s a very simple and effective tool but you need to pay a decent amount of money to get value out of the app. The free version doesn’t support HD recordings which limits its capabilities a lot.
Conclusion
Many people wonder how to record a presentation on Google Slides. Fortunately, there are many programs, and you can easily switch to anything you want. We have found that QuickTime and the Game Bar are amazing options for unlimited recording which also comes for free. However, if you’d like to upload your content online with a click of a button, you might fight Panopto and Loom better.
If you liked our presentation about screen recording, you can find these tutorials helpful, too:

![What is a Storyboard [Theory, Examples and Mega Inspiration]](https://i.graphicmama.com/blog/wp-content/uploads/2020/11/26125451/what-is-a-storyboard.jpg)