3. Name and Arrange the Body Parts


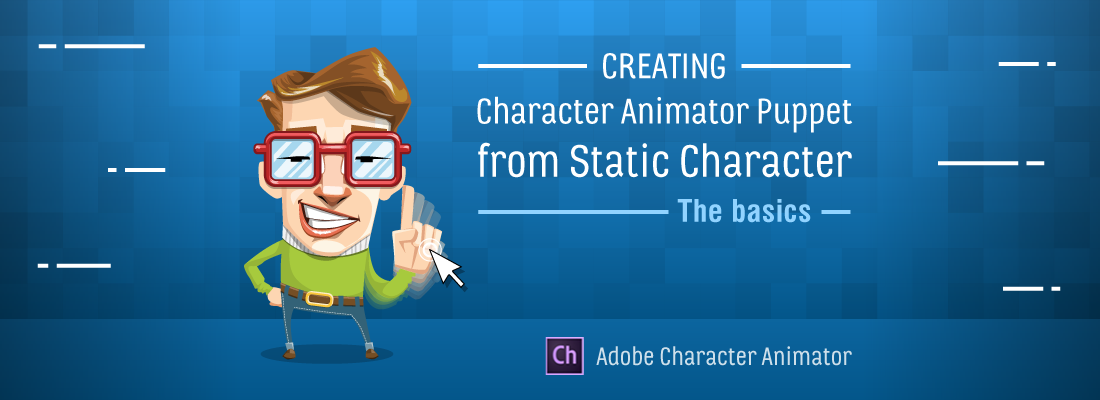
 Want to create explainer videos in Adobe Character Animator but don’t know where to start? We’ve outlined the basics of creating an Adobe Character Animator puppet out of a static character. You will, as well, learn the fundamentals of working with the software: from the preparation of your character, through its transformation into a puppet, and the video export in the end.
Also, you will have the opportunity to download this puppet absolutely for free, so roll up your sleeves and heat up Adobe Character Animator. Let’s get this thing going!
1. Get a Character
Since you are already interested in the process of creating an Adobe Character Animator puppet out of a static character, the odds are, you have a character on your screen… or on your mind, at least. Ha! If you still don’t, the first step would be to get one. How?
The opportunities here are limitless. You can choose among tons of characters across the web available for sale or for free. Also, you can always get yourself a character design created exclusively for you. Thousands of artists worldwide would love to do this for you.
Last but not least, you can come up with your own character design if you have drawing skills yourself. You will need to use appropriate software such as Adobe Photoshop or Adobe Illustrator, of course. For the purpose of this article, we’ve used the free vector character Mr.Geekson which was originally drawn in Adobe Illustrator. Isn’t he handsome?

2. Arm Yourself with a Webcam and a Mic
In order to use Adobe Character Animator properly, you will need a webcam and microphone. For those of you who still don’t know why here is the heads-up: the software detects your facial expressions and movements by using the device’s camera in order to animate the puppet accordingly. Pretty awesome, right?
Now, the camera might be compulsory but the mic is optional. You will need it to narrate your character yourself but you can always use a guest voice-over if you are not comfortable with doing the talking part. Full speed ahead!
 3. Name and Arrange the Body Parts
Okay, this step might look a little bit tedious but why don’t you look at it this way: this is the step in which your character gets transformed into a real Adobe Character puppet! Now, if you are drawing the character yourself, you will need to make several variations of the character’s mouth, eyes, eyebrows, body parts, etc., so the puppet can recreate different expressions, such as happy, sad, angry, and surprised.
The next step would be to group and name the facial and body parts in a way that Adobe Character Animator would recognize. The software will use this keyword naming to trigger the specific emotions detected from your own face via the camera.
In case you are ordering a puppet from GraphicMama, you don’t have to worry about this step. You will receive all necessary puppet elements and their variations included in the package: grouped, named, and ready to be dropped into Adobe Character Animator without further adjustment.
Here is how we named Mr. Geekson’s facial and body elements:

4. Import Your Character in Adobe Character Animator
Your character is now called a puppet. Congrats! Now all the naming you’ve made to your character will be incorporated into Adobe Character Animator. It doesn’t matter which software you used for creating your puppet in the first place – Adobe Illustrator or Adobe Photoshop. Adobe Character Animator will adopt all changes made to your original AI or PSD file of your character.

If you managed to arrange and name your character’s elements properly in the AI or PSD file, your puppet should be able to follow your head movements and blink. It should also lipsync when you speak. If the software doesn’t detect your facial expressions the way it should, you can always adjust all of these settings manually by using Adobe Character Animator’s panels and functions.

5. Assign Tags and Behaviors
Use the tools in the Puppet Panel to assign tags and behaviors to the different parts of your puppet’s body. Here is what we did for Mr. Geekson: We tagged all body parts accordingly. Then we made the arms draggable, allowing them to be controlled with the mouse. The tie was assigned with “dangle” so it can sway pleasantly and the legs were assigned with “fixed”. Here are a few previews to help you get a better idea:

6. Assign Key Triggers
For some of you it may be easier to control the puppet’s arm movements by using the keyboard or using both the mouse and the keyboard to control the puppet. You have the option to assign keys that will later trigger a certain action when being pressed. Here is what we did for Mr. Geekson:
We made different keyboard buttons (K, J, L, S, U, and I) associated with different hand positions or items held by the hand. This way you can easily control the arms while the camera also records your facial expressions and talking.

7. Right into the Scene Panel. Action!
You can record your performance in the Scene Panel. Make sure your face is well illuminated, so the software can effortlessly detect and recognize your expressions. Also, try to eliminate any background noises in case you are recording your own voice.
See the Audio Level bar? It shows you the sound level of your voice and it will let you know if you need to speak up. Ready to start animating your puppet? All eyes on you!

If you are not comfortable with multitasking, the software lets you record different parts of your puppet separately. You can take care of the face movements first, then the eye gaze, the lip-sync, etc. Also, you can regulate the length of each recording, and make all kinds of further adjustments so the different layers can blend together nicely.

8. Exporting
Once you are ready and happy with the result, it’s time to export your performance in a video or image sequence. If you choose to export it as a video, Adobe Character Animator will automatically open Adobe Media Encoder where you can choose and adjust the settings of how exactly you want your video to be exported. If you choose the image sequence option, the software will give you a variety of formats from which you can pick your preferred one. You also have the opportunity to connect your social media profiles and share your video there right away.
Voila!
 You’ve got a fully functional puppet in your hands and your first explainer video created with Adobe Character Animator is already a reality.
Now that you’ve learned the basics of creating an Adobe Character Animator puppet from a static character, go ahead and experiment with the software. Your opportunities are indeed endless. If you want to skip the character-to-puppet transformation part, you are welcome to get the one we used in this post – Mr. Geekson who is fully free to download and all set to be dropped into Adobe Character Animator.
In case you want to get started with a pre-made character design, you may throw an eye at our suggestions. Another option is to order a brand new character or a fully prepared puppet based on your taste and requirements.
Have fun, everyone, and don’t forget to brag about your own explainer videos in the Comment section below!
Mr. Geekson Adobe Puppet FREE DOWNLOAD