


If we want to create beautiful designs, we need to know what the principles of design are. Art and graphic design share the same design principles, and learning how to use them can help us improve our work.
In this article, we present you with a list of design principles, giving you a better understanding of how they work and why they matter.
And we also provide you with plenty of beautiful design examples, to illustrate the main points.
The 10 Principles of Design Article Overview:
1. Alignment
2. Hierarchy and Emphasis
3. Contrast
4. Scale and Proportion
5. Proximity
6. Balance
7. Color and Pattern
8. Space
9. Movement
10. Harmony (Unity)
1. Alignment in Graphic Design
The first principle of design that we are going to discuss is alignment.
# Lining things up, or not?
Alignment refers to how different parts of a design are lined up in relation to each other. But don’t forget that you can deliberately break the alignment to grab attention!
# Helps to organize and avoids clutter
Without alignment, the elements on your design will look disorganized, confusing, and cluttered. For example, look at the poster below. The designer wanted to create some movement, but suddenly almost nothing is aligned. As a result, the viewer gets dizzy from the dancing lines.
# Improves scanability
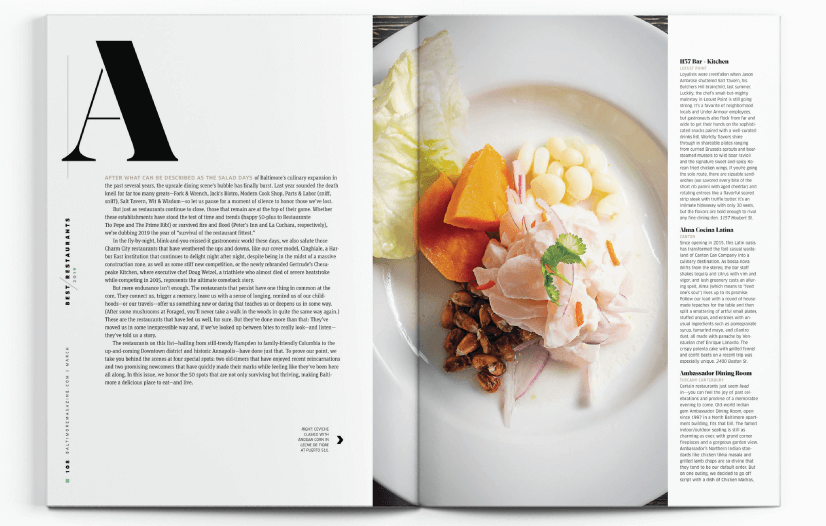
Alignment is very important, as it guides the eye and improves the scannability of content. Look at the example below – the text is divided into numerous aligned columns, which organize the content and everything looks neat:
# Creates a connection between parts and a sense of unity
Not in the last place, alignment in design creates a connection between the different parts of your design. Even though we can’t read the text in the following example, the alignment helps us to navigate. There is no doubt which picture belongs to which block of text.
# How it is achieved – grid, center, and edge alignment
People often use a grid to organize the parts of their design around it. Often, design software offers premade grid setups, so you are ready to start designing. Of course, the grid is not visible in the final result, but the alignment created is very noticeable:
Alignment can be centered and edge. Usually, the designer will pick one of them to organize the elements. See the example below:

Now that we’ve discussed the main points of the alignment principle, here are some more inspirational designs:

Somneo Design by Dmitrii Sverdliuk
2. Hierarchy in Graphic Design
The next principle of design is the hierarchy. Basically, hierarchy is the arrangement of different parts of the design, by size and color, to imply importance.
Emphasis is more or less the same – which design elements we choose to stand out, and which we “keep down”.
Hierarchy is an important principle in art and design because it directs the viewer’s attention and helps him focus.
Here is how to apply hierarchy and emphasis:
# Vary size to increase/decrease the visibility of images/text
Enlarging an object’s size is the best way to guide attention. The biggest text and pictures will immediately catch the viewer’s eye, whereas the smallest shapes will be seen last.
Hierarchy is easily applied by the use of titles, headings, subheadings, and body text. The first thing the reader should immediately see is your title. That’s why it’s significantly larger than other elements in your design.
As you can see in the following example, the title (heading) is the largest and boldest, as well as the photo. Secondary to that is the body text. Highlighting the price also shows its importance in the design.
# Use color and contrast to highlight important parts
Imagine you have a block of text in black and a certain part is in red color. The red will draw the eye because it’s a different color from the main text.
Designers often use contrasts between different colors to attract attention and imply what’s the most important part to look at.
You can find inspiration for some great color combinations in the dedicated article. You will be armed with some powerful color combinations to create contrast in your design.
Here are some more beautiful designs to show you the hierarchy and emphasis principles put into practice:
3. Contrast in Graphic Design
The next principle of design, contrast, is closely connected to hierarchy and emphasis. Contrast can be achieved by varying shapes, colors, scale, and layout.
# Make certain parts pop
Using contrast in your work shows the viewer what is important in your design and what is secondary.
Here is a very simple example of the contrast between a white label with product info and a colorful background:
# Creating depth
Contrast also creates depth in your design – elements with lower contrast “fade away” and parts with high contrast “pop” and move to the foreground.
# Accessible design
Sufficient contrast is also crucial for accessible designs. Accessible design means, that people with visual impairments can still read and properly see your content.
Some people might find it hard to read the following body text, because of poor contrast between the text and background color:

And here are our suggestions for how a good contrast looks like:

Lavva by Gander
4. Scale and Proportion in Graphic Design
Scale and proportion have to do with how different parts relate to each other – by size.
# Creating separate sections by varying size
Scale and proportion help you perceive information in separate sections and help with creating structure.
Look at the following example and try to analyze how the scale principle was applied:
# Scale and proportion play a big part in creating contrast
Elements of different sizes help in creating contrast. Notice the different font-weight and sizes in the following example. Because it is primarily a text-based design, there is a need of creating a contrast between the different sections. And one of the ways this is achieved is by scale and proportion.
Have a look at these beautifully designed pieces, all of them taking into account the scale design principle:

Sophia’s Tea Branding by Marka Works and Mustafa Akülker
5. Proximity in Graphic Design
The eye perceives elements placed close to each other as a group. Or, if they are visually connected somehow (fx. by color and shape), the eye again perceives them as a whole. That’s the principle of proximity.
# It helps to organize
People use this principle of design to organize different parts of the design and to increase readability.
Notice how the products below are organized – their name, price, and description are deliberately placed close to each other. This way, they are perceived as a group:
# Creates focal points
You can imagine that grouping and creating visual connections will also help you in creating focal points. You can arrange your elements so that certain part stands out by simply using the proximity principle:
Here are some more examples of the proximity design principle in action:
6. Balance in Graphic Design
Think of the balance principle as a scale. If you put too many things on one side, the scale won’t be balanced.
# Keep your scales even
It’s aesthetically pleasing for the eye to have parts of a design, equally placed from both sides of an invisible centerline.
There are 2 ways to do that:
# Symmetrical balance
This is when the elements on both sides of the centerline are similar in size and volume (weight). Because it’s the easiest to achieve, symmetrical balance can become boring. But here is a good example of a symmetrical balance:

Maxim Shkret
# Asymmetrical balance
This kind of balance is bolder, can bring interest and surprise to a design. The equilibrium in asymmetrical balance is achieved by contrasting 1-2 big shapes to numerous smaller shapes.
In the next example, you can see that there is one big photo, balanced by 2 smaller ones on the right:
Let’s see some more examples of balance in design:

Tea Shop Landing Page by Ann Ivanovskaya
7. Color and Pattern in Graphic Design
The next two principles are color and pattern.
# We are good at detecting patterns
We often see patterns in nature – a pattern is simply a repeating element – color, shape, form, texture.
A pattern is very pleasing to the eye and we are wired to look for patterns around us.
In the following example, we can notice a pattern of little lines, but that’s not the only pattern – we also notice a repetition in color. We also find a pattern in font thickness (weight), again helping us to perceive the different pieces as one coherent design:
# Pattern as a set standard
A pattern can be a repeating object, but also can mean “a set standard”.
For example, we are used to looking for navigation menus – at the top of a web page. Set standards help us navigate quickly and users are happy to have them!
Have a look at some more beautiful designs, using the color and pattern principles of design:
8. Space in Graphic Design
One of the most important principles of design is space. Why?
Because no one likes to be in a room, cramped with furniture, even if the furniture is exquisite itself.
# Breathing room for your design
The space principle deals exactly with that – giving room for the different elements to breathe:
# Bond. James Bond. Space. White Space.
Often when we say “space” in a design context, we actually mean white space – the blank space, not filled with elements.
White space eases the eye and can be used to divide different sections of your information into blocks:
# Offer information piece by piece, step by step
If you don’t use enough space, then you are going towards the other design principle – proximity. All the elements in proximity will be viewed as one and you might not want that. Most likely, you want nicely divided blocks of content.
Literally, the white space is missing in this example:
# Cleanliness
Adding negative space to your designs also creates a sense of cleanliness, purity, and high quality.
That’s why this design principle is a crucial one. But it’s also one of the easiest to apply and elevate your design/work.
Here is how other designers used space to enhance their work:
9. Movement in Graphic Design
The next principle of design we are going to look at is movement. Movement is placing the parts of a design in such a way, that they guide the eye and create interest.
# Movement – leading the eye with invisible lines
This can be achieved by creating invisible lines with patterns, repeated design elements, anything that adds direction.
Below you can see examples of the movement principle in design in action. Try to find the invisible lines and where they are pointing to.
10. Harmony and Unity in Graphic Design
And the last design principle – harmony combines all the other principles into one. This time, we are not looking at the individual parts, but the design as a whole.
Harmony is achieved with the following methods:
1. Perspective
This method combines proximity, space, and movement – harmonious design requires a sense of distance between the elements.
2. Similarity, continuation, repetition
This method is making sure that we have similar elements in our design, binding the design together.
3. Rhythm and repetition
Simply put, rhythm in design is the use of recurring elements – it can be created with color, size, the position of elements.
For example, your body text can be one color (black) and your subheadings – another color (teal). That way you create a rhythm in your design and help the viewer digest the information easier.
To better illustrate these methods, all put into action, look at the following examples:
Applying Principles of Design into Practice
The principles of design can be incredibly useful if considered at the beginning of a project. They can save a lot of hours later, trying to battle with your design and make it look good.
Don’t worry -it might take some time to start applying the design principles with confidence. Because it’s not innate knowledge, be patient and enjoy the process!
We hope this article inspired you and that it will serve as a starting point for further learning!
Here are a few more articles you might enjoy: